Procedural Materials in Blender
- Introduction to Procedural Materials
- Understanding Blender's Cycles Engine
- Basics of Procedural Texturing
- Advanced Procedural Texturing
- Shading Basics
- Procedural Shading Techniques
- Practical Procedural Materials
- Realistic Lighting and Shading
- Advanced Techniques
- Environment Shaders in Cycles
- Procedural Effects
- Rendering and Compositing
- Creating a Final Project
Advanced Techniques
Advanced Bump Mapping Techniques in Blender's Shader Editor
Texturing technique for bumps/wrinkles in computer graphics.
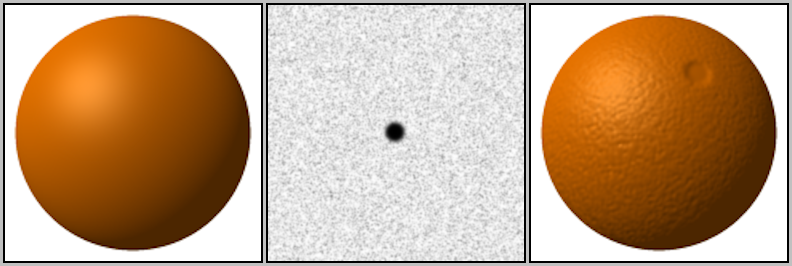
Bump mapping is a technique used in 3D computer graphics to simulate bumps and wrinkles on the surface of an object. This is achieved by perturbing the surface normals of the object and using the perturbed normal during lighting calculations. The result is an apparently bumpy surface rather than a smooth surface.
Deep Dive into Bump Mapping
Understanding the Bump Node
The Bump Node in Blender's Shader Editor is a powerful tool that allows you to add a lot of detail to your materials without the need for complex geometry. The Bump Node generates a normal map from the grayscale values of a texture. The darker areas of the texture are treated as low points, and the lighter areas as high points, creating the illusion of depth on the surface of the material.
How to Use the Bump Node
To use the Bump Node, you first need to add it to your material's node setup. You can do this by pressing Shift+A in the Shader Editor, going to Vector > Bump. Connect the output of your texture node to the Height input of the Bump Node, and then connect the Normal output of the Bump Node to the Normal input of your shader.
Advanced Bump Mapping Techniques
Creating Complex Bump Maps Using Procedural Textures
One of the advantages of procedural textures is that they can be used to generate complex bump maps. By combining different procedural textures, you can create a wide variety of surface details. For example, you can use a Noise Texture to create a rough surface, and then add a Voronoi Texture to create larger bumps.
Using the Normal Map Node for More Detailed Bump Mapping
The Normal Map Node is another useful tool for bump mapping. It allows you to use a normal map, which is a type of texture that stores surface normal information. This can be used to add even more detail to your bump mapping. To use the Normal Map Node, you need to add it to your node setup (Shift+A > Vector > Normal Map), and then connect your normal map texture to the Color input of the Normal Map Node.
Practical Application of Advanced Bump Mapping
Creating Realistic Materials with Advanced Bump Mapping
By using advanced bump mapping techniques, you can create highly realistic materials in Blender. For example, you can use these techniques to create a realistic wood material with detailed grain and knots, or a rough stone material with a lot of surface detail.
Tips and Tricks for Optimizing Bump Mapping in Cycles
When using bump mapping in Cycles, there are a few things you can do to optimize your render times. One of the most important things is to make sure that your bump maps are not too detailed. If the details are too small, they can cause noise in your render, which can increase render times. Also, try to use the minimum amount of bump mapping necessary to achieve the look you want. Overuse of bump mapping can also increase render times.
By mastering these advanced bump mapping techniques, you can greatly enhance the realism of your materials in Blender's Shader Editor.